
Interface & Upload
- Glowforge Interface Overview: Visual guide for the different buttons in the Glowforge Interface.
- Glowforge Keyboard Shortcuts: A list of helpful keyboard shortcuts to use when working with the Glowforge interface.
- How to Upload and svg or pdf file (Video).
Trace Tool
- How to use the Trace Tool: Step-by-step instructions on how to use the trace feature in the Glowforge Interface.
- Trace Feature Walkthrough (Video).
Manual Settings
If you decide to use materials not supplied by Glowforge, you will need to enter the settings for the laser yourself. We are slowly building our own recommendation list for custom settings below. If you’re not sure what settings to use for your material, we will try and help you find out.
We recommend bringing extra of your material so you can do some tests to make sure your final project comes out as best it can.
- Working With Manual Mode: A description of what each setting is and how it effects your project.
- How to Engrave Without the Crumb Tray: Learn how to adjust the software to engrave an item to thick to place on top of the crumb tray.
Suggested Settings for Acrylic
- 1/16″ Thick Acrylic: CUT: Power- FULL Speed-180; ENGRAVE: Power- FULL Speed-1000
- 1/8″ Thick Acrylic: CUT: Power- FULL Speed-160; ENGRAVE: Power- FULL Speed-1000
- 3/16″ Thick Acrylic: CUT: Power- FULL Speed-135; ENGRAVE: Power- FULL Speed-1000
- 1/4″ Thick Acrylic: CUT: Power- FULL Speed-110; ENGRAVE: Power- FULL Speed-1000
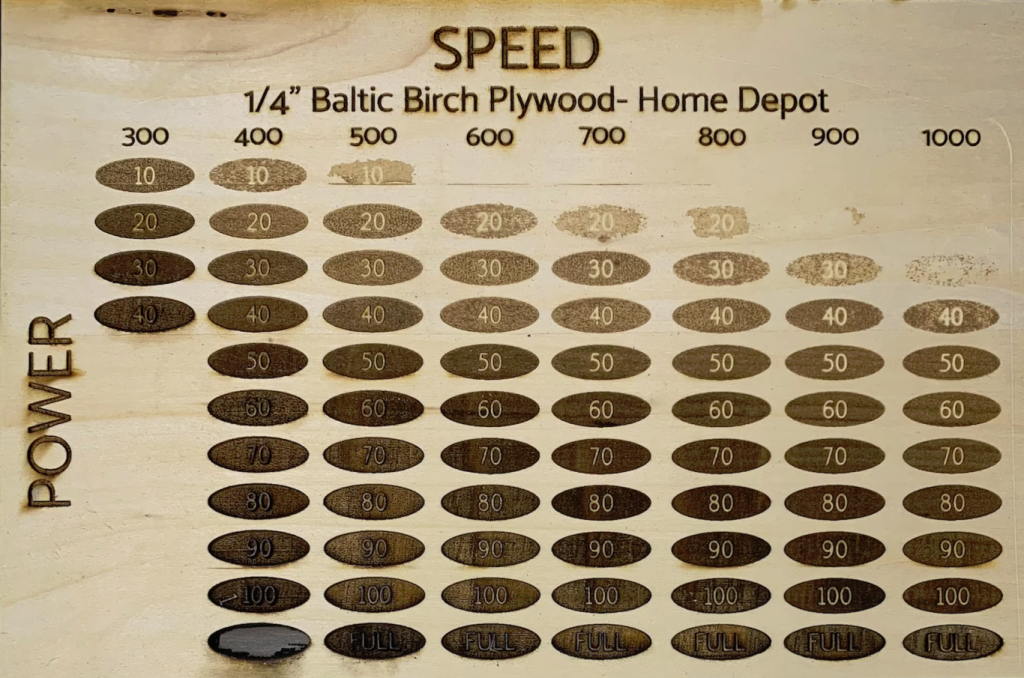
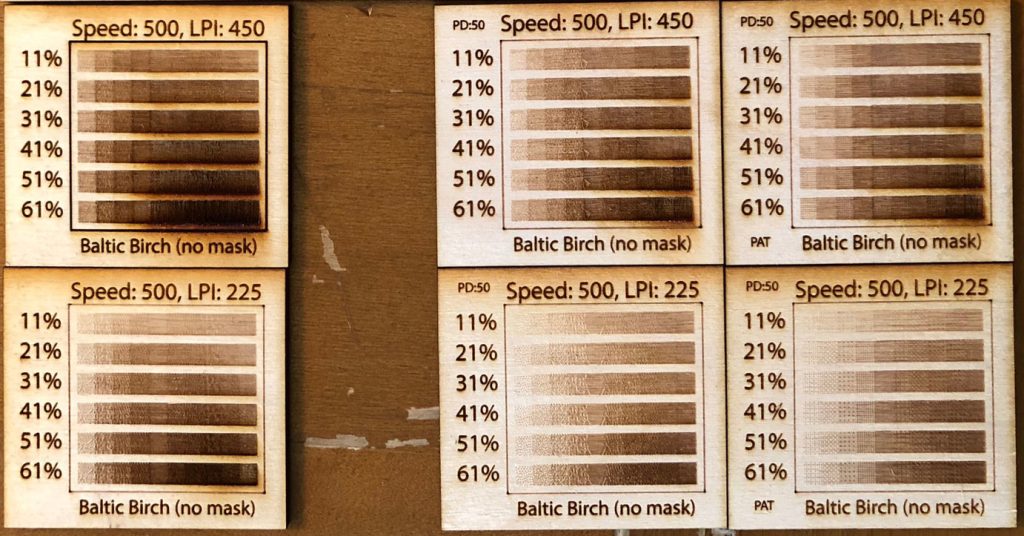
Suggested Settings for Plywood
- 1/8″ Thick Baltic Birch Plywood: CUT: Power- FULL Speed-200; ENGRAVE: Different speed/power combinations give you different results (see image for examples).
Suggested Setting for Ceramic Tile
Ceramic Tile can only be etched. This burns away the glaze and you can use ink to make the etched portion “pop”. Etchings work best with a high DPI/LPI. You want to use full power and can try varying the speed, but we have found 1000 speed to work fine.
- Ceramic Tile – Engrave only: POWER: Full; SPEED: 1000